وضاحت
Authorize.net WooCommerce addon adds a payment option for customers to pay with their Credit Cards.
WooCommerce 3 Compatible
Features
- Accept Card right on your website.
- No redirecting on other url.
- Easy to install and configure
- Option to configure success & failure message
- Safe way to process credit cards and debit cards on WooCommerce using Authorize.net
- This plugin uses internal card processing, so faster and more relaible.
Support
So that others can share in the answer, please submit your support requests through the WordPress forums for Authorize.net for WooCommerce(https://wordpress.org/support/plugin/os-woocommerce-authorizenet-aim).
تصوير
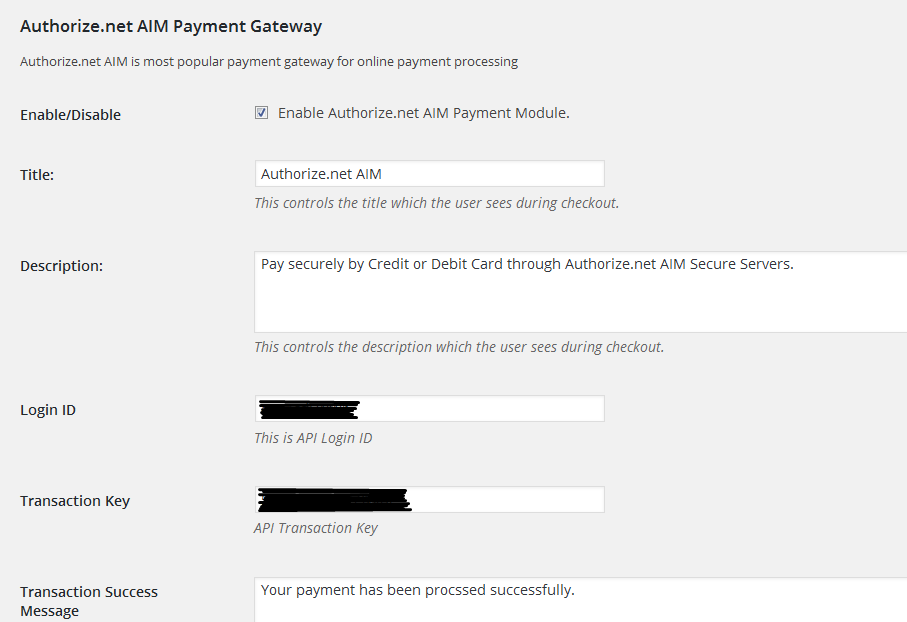
First Data admin settings 1. 
First Data admin settings 2.
انسٽاليشن
Minimum requirements:
WordPress 4.3+
WooCommerce 2.6+
PHP 5.5x
MySQL 5.2x+
Installation from within backend:
- In plugin manager, click “Add New”
- Search for “os-woocommerce-authorizenet-aim”
- Click “install”
- Activate the plugin once it is installed
FTP upload installation method:
- Upload the
os-woocommerce-authorizenet-aimfolder to the/wp-content/plugins/directory using your FTP client - Activate the plugin through the ‘Plugins’ menu
Zip upload installation method (make sure uploads up to 5MB are allowed for your hosting):
- Login to your WordPress site administrator panel and head over the ‘Plugins’ menu
- Click ‘Add New’
- Choose the ‘Upload’ option
- Click Choose file (Browse) and select the os-woocommerce-authorizenet-aim.*.zip file.
- Click Install Now button.
- Once it is complete, activate the plugin.
FAQ
- Installation Instructions
-
Minimum requirements:
WordPress 4.3+
WooCommerce 2.6+
PHP 5.5x
MySQL 5.2x+Installation from within backend:
- In plugin manager, click “Add New”
- Search for “os-woocommerce-authorizenet-aim”
- Click “install”
- Activate the plugin once it is installed
FTP upload installation method:
- Upload the
os-woocommerce-authorizenet-aimfolder to the/wp-content/plugins/directory using your FTP client - Activate the plugin through the ‘Plugins’ menu
Zip upload installation method (make sure uploads up to 5MB are allowed for your hosting):
- Login to your WordPress site administrator panel and head over the ‘Plugins’ menu
- Click ‘Add New’
- Choose the ‘Upload’ option
- Click Choose file (Browse) and select the os-woocommerce-authorizenet-aim.*.zip file.
- Click Install Now button.
- Once it is complete, activate the plugin.
- A question that someone might have
-
An answer to that question.
جائزا
ھن پلگ ان لاءِ ڪي به رايا ناھن.
تعاون ڪندڙ & ڊولپرز
“Authorize.net for WooCommerce” اوپن سورس سافٽ ويئر آهي. ھيٺين ماڻھن ھن پلگ ان ۾ حصو ورتو آھي.
تعاون ڪندڙترجمو ڪريو “Authorize.net for WooCommerce” توهان جي ٻولي ۾.
ڊولپمينٽ ۾ دلچسپي؟
ڪوڊ براؤز ڪريو، چيڪ ڪريو SVN مخزن، يا رڪنيت حاصل ڪريو ڊولپمينٽ لاگ پاران RSS.